
A full pan of cinnamon rolls is a commitment. Twelve rolls, a 9×13 dish, a whole afternoon — and then half of them sit in the fridge for three days, going stale while you pretend you’ll finish them. Most people don’t need twelve rolls. They need six. Six warm rolls on a Sunday morning, eaten while they’re still soft, with nothing left over to feel guilty about.
That’s the whole idea here. Six pumpkin cinnamon rolls in a small round pan. Same soft dough, same cinnamon-sugar swirl, same cream cheese frosting melting into the spirals — just half the batch. The dough comes together in one bowl, the pumpkin keeps it soft for an extra day, and the whole thing is in the oven in about an hour and a half, most of which is the dough rising while you do something else.
The pumpkin isn’t a gimmick. It does real work in this dough. Pumpkin puree adds moisture, and moisture is what keeps a cinnamon roll soft instead of bready. It adds colour — that warm orange-gold that makes the rolls look like autumn even before the frosting goes on. And it adds a gentle, earthy sweetness that sits underneath the cinnamon instead of fighting it. You taste pumpkin, but you taste cinnamon first. That’s the balance that makes these work.
This is also a forgiving recipe. If you’ve never made yeasted dough, this is a good place to start: the dough is soft and easy to handle, the rise times are generous, and there’s a full troubleshooting section below for everything that can go sideways. And if you have made cinnamon rolls before, the small-batch size is the part you’ll love most — because a pan of six disappears, and a pan of twelve lingers.
⚡ Quick Answer: Whisk ½ cup (120 ml) of warm milk, ⅓ cup (80 g) of pumpkin puree, 3 tablespoons of melted butter, 1 egg, ¼ cup (50 g) of sugar, 2¼ teaspoons of instant yeast, ½ teaspoon of salt and 1 teaspoon of pumpkin pie spice into 2¼ cups (280 g) of bread or all-purpose flour until a soft dough forms. Knead for 6–8 minutes, then let it rise for 60–75 minutes until doubled. Roll it into a 12×9-inch rectangle, spread with 3 tablespoons of softened butter, sprinkle over ⅓ cup (70 g) of brown sugar mixed with 1½ tablespoons of cinnamon and ½ teaspoon of pumpkin pie spice, roll it up, slice into 6 rolls, and set them in a greased 8-inch round pan. Let them rise again for 30–40 minutes, then bake at 350°F (175°C) for 22–26 minutes until golden and 190°F (88°C) inside. Spread with cream cheese frosting while still warm and serve.
TL;DR – Recipe at a Glance
- Prep time: 25 minutes of hands-on work
- Rise time: 60–75 minutes for the first rise, 30–40 minutes for the second
- Bake time: 22–26 minutes at 350°F (175°C)
- Total time: About 2 hours and 15 minutes, mostly waiting on the dough
- Yield: 6 rolls in an 8-inch round pan
- Servings: 6, one roll each — or 3, if you’re honest about seconds
- Difficulty: Easy to moderate — a great first yeasted dough
- Flavour: Warm cinnamon and pumpkin spice, brown sugar, tangy cream cheese frosting
- Texture: Soft, pillowy, gooey in the middle, lightly crisped on the edges
- Calories: About 380 per roll with frosting
- Make-ahead: Yes — overnight rise in the fridge works beautifully
- Best eaten: Warm, within a few hours of baking, frosting still soft
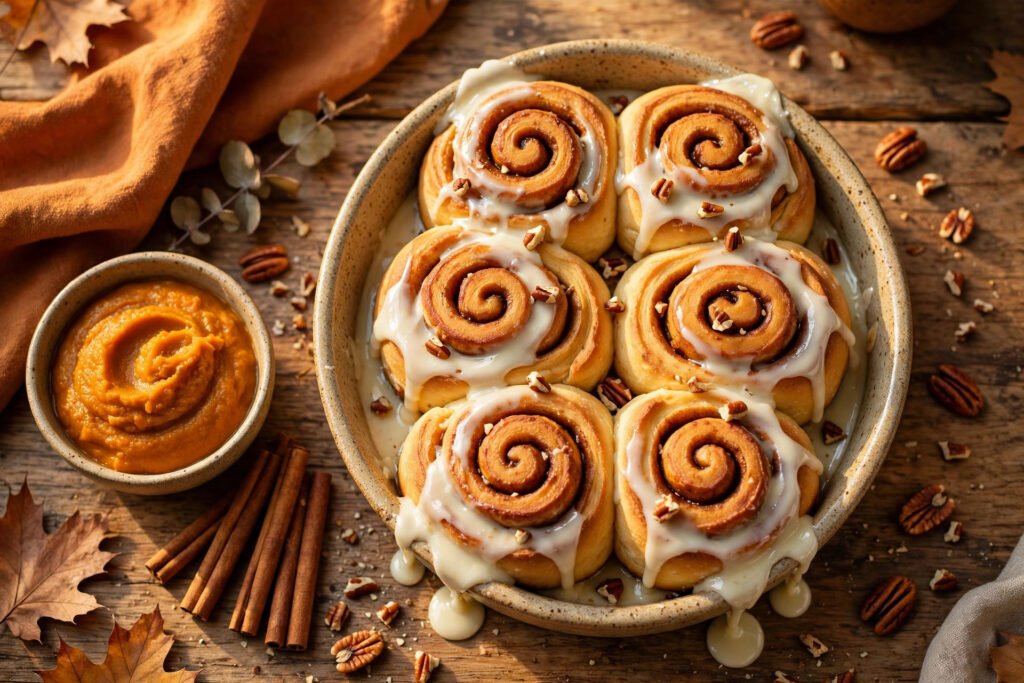
Why You’ll Love These Small Batch Pumpkin Cinnamon Rolls
- Six rolls, not twelve, and that’s the point: A small batch means no stale leftovers, no freezer Tetris, and no eating cinnamon rolls for four straight days out of obligation. Six rolls is breakfast for a family, or a treat for two with seconds. The pan empties, and that’s a good thing.
- The pumpkin keeps them soft: Pumpkin puree is mostly water, and that water stays in the crumb. These rolls are still soft the next day — which is more than you can say for most cinnamon rolls, which turn into hockey pucks overnight. The pumpkin is doing quiet work you can taste.
- One bowl, no stand mixer required: You can make this dough with a wooden spoon and your hands. A mixer helps, but nothing here needs one. If your kitchen has a bowl, a rolling pin (or a wine bottle), and an 8-inch pan, you have everything.
- They smell like October: The cinnamon, the pumpkin spice, the brown sugar melting into butter — the smell fills the house about ten minutes into baking. It’s the kind of smell that pulls people into the kitchen without being asked. That’s not a small thing.
- Make them tonight, bake them tomorrow: The dough can rise overnight in the fridge, which means warm rolls on a Saturday morning with about ten minutes of actual work. Roll them up tonight, put the pan in the fridge, and bake straight from cold in the morning.
Why Small Batch Beats a Full Pan
Most cinnamon roll recipes make twelve. Twelve is the standard because it’s the size of a 9×13 pan, and a 9×13 pan is the standard because that’s what most people own. But twelve rolls is a lot of rolls. For a household of two, it’s three days of cinnamon rolls. For a household of one, it’s a week — and by day three, they’re not the rolls you fell in love with anymore. They’re dry, and you’re eating them out of duty.
Six rolls solve that. An 8-inch round pan is the right size for a small batch, and it has a side benefit most people don’t notice: the rolls bake differently in a round pan. In a 9×13, the corner rolls are far from the centre rolls, and they bake unevenly — the corners get crisp while the middle stays doughy. In an 8-inch round pan, six rolls sit close together, shoulder to shoulder, and they bake evenly. The outside rolls get a light golden edge. The inside rolls stay soft and gooey. Everyone gets a good one.
And then there’s the time argument. A small batch rises faster. Less dough means the yeast has less to lift, and the rolls proof in about 30–40 minutes instead of an hour. The whole recipe — mixing to frosting — takes about two hours and fifteen minutes, and over an hour and a half of that is the dough rising while you do nothing. Your hands-on time is about twenty-five minutes. That’s less time than a trip to a bakery, and the rolls are warm.
The one thing a small batch can’t do is feed a crowd. If you’re baking for a holiday brunch with ten people, make two pans, or make the full batch. But for a normal morning — a family of four, a couple, a solo baker who wants a treat — six is the right number.
The Pumpkin in the Dough — What It Actually Does
Pumpkin puree looks like an ingredient you add for flavour. It’s not, or not only. In this dough, pumpkin is doing three jobs at once, and the flavour is the least important of the three.
The first job is moisture. Pumpkin puree is about 90% water, and that water goes straight into the crumb. A cinnamon roll’s worst enemy is dryness — the rolls sit in a hot oven, the sugar filling pulls moisture out of the dough, and by the time they cool, a lean dough can feel bready and stiff. The pumpkin’s water fights that. It keeps the crumb soft and slightly custardy, and it keeps it soft for longer. A plain cinnamon roll is best within a few hours. A pumpkin cinnamon roll is still soft the next morning, and that’s the pumpkin.
The second job is colour. Pumpkin puree turns the dough a warm, golden orange — not a loud orange, more like the colour of a late-afternoon sun. It makes the rolls look like autumn before you add a single spice.
The third job is flavour, and it’s the subtlest of the three. Pumpkin on its own is mild — earthy, a little sweet, not very assertive. In a cinnamon roll, it sits underneath the cinnamon and brown sugar and gives them something to stand on. Without it, the filling tastes like sugar and spice floating on plain bread. With it, the whole roll tastes rounder, deeper, more like a finished thing. It’s the difference between a song with a bass line and one without.
Use pure pumpkin puree, not pumpkin pie filling. The cans look nearly identical on the shelf, and the pie filling is the one that will ruin the dough — it’s already sweetened and spiced, and it throws off the sugar and spice balance. The can you want says “100% Pure Pumpkin” or just “Pumpkin”. Libby’s is the one most people know, but any store brand that lists one ingredient — pumpkin — works. Check the label: if the ingredient list has more than pumpkin, put it back.
Fresh pumpkin works too, if you have the patience. Roast a sugar pumpkin — the small ones, not the carving kind — until soft, scoop out the flesh, and blend it until smooth. It takes about an hour, and the puree will be a little thinner than canned, so let it drain in a sieve for twenty minutes before measuring. Fresh puree tastes a touch brighter and a little less sweet than canned. Canned is more consistent, and for a recipe where consistency matters, canned is the honest recommendation.
Yeast: The One Thing That Can Kill This Recipe
Everything in this recipe is forgiving except the yeast. The yeast is a living thing, and it has exactly one hard rule: water hotter than 130°F (54°C) kills it. Not weakens it, not slows it down — kills it. And dead yeast doesn’t rise, which means flat, dense rolls that taste like sweet bread bricks.
The milk temperature is where this goes wrong. The recipe calls for warm milk, about 110°F (43°C) — warm to the touch, like a baby’s bottle. If you can hold your finger in it comfortably for ten seconds, it’s right. If it feels hot, it’s too hot. Let it cool. A kitchen thermometer takes the guesswork out — 110°F is the number — but the finger test works fine if you don’t have one.
Instant yeast and active dry yeast both work here, and the difference between them is smaller than the internet makes it sound. Instant yeast (sometimes sold as rapid-rise or bread machine yeast) can go straight into the flour — no proofing, no waiting. Active dry yeast needs to be dissolved in the warm milk with a pinch of sugar first, and left for five to ten minutes until it foams. That’s the only difference. The recipe below is written for instant yeast, because it’s simpler, but if all you have is active dry, dissolve it in the warm milk first and carry on — same amount, same result, five extra minutes.
How do you know the yeast is alive? The first rise tells you. After 60–75 minutes in a warm spot, the dough should be about double in size. If it’s barely moved, the yeast is either dead or the kitchen is too cold. A cold kitchen is the fixable version of this problem — put the bowl in the oven with just the light on, or on top of the fridge, or near a sunny window. The oven-with-light trick is the most reliable: it holds the dough at about 80°F (27°C), which is yeast’s happy place. If the dough still hasn’t moved after two hours in a warm spot, the yeast was dead, and the kindest thing is to start over with fresh yeast. It happens to everyone at least once.
The Spice Mix — Cinnamon, and What Sits Next to It
Cinnamon is the flavour people taste first in these rolls, and not all cinnamon is the same. There are two kinds on the shelf, and the difference matters more than most recipes admit.
Cassia cinnamon is the one in most supermarket jars. It’s strong, a little spicy, almost hot — the flavour most people think of as “cinnamon”. Ceylon cinnamon, sometimes called true cinnamon, is softer, sweeter, more floral, with a hint of citrus. Cassia is the bolder choice, and for a pumpkin cinnamon roll, bold is right. The pumpkin is mild, the brown sugar is sweet, and the cinnamon needs to stand up to both. Cassia does. Ceylon is lovely in delicate things — a custard, a cup of tea — but in a cinnamon roll it can disappear under the sugar. Use cassia here, and save the Ceylon for something gentler.
Pumpkin pie spice is the second player, and it’s a blend, not a single spice: cinnamon, ginger, nutmeg, allspice, and cloves, usually in that order of quantity. You can buy it ready-made, and the ready-made jar is fine. Or you can mix your own: 3 tablespoons of cinnamon, 2 teaspoons of ginger, 2 teaspoons of nutmeg, 1½ teaspoons of allspice, and 1½ teaspoons of ground cloves. That makes about a third of a cup, which will last you through the whole autumn. The homemade version tastes fresher, because ground spices lose their punch after six months on a shelf, and the jar you mixed yourself is, by definition, fresh.
The spice amounts in this recipe are deliberate. The filling has 1½ tablespoons of cinnamon and ½ teaspoon of pumpkin pie spice, and the dough has another teaspoon of pumpkin pie spice. That sounds like a lot. It is a lot — and it’s the right amount, because sugar dulls spice. A cinnamon roll without enough spice tastes like sweet bread with a rumour of cinnamon. The filling should look dark and smell strong before it goes into the oven. If your filling looks pale, add more cinnamon. Nobody has ever complained that a cinnamon roll had too much cinnamon.
The Recipe Card
Everything you need, in one place. The sections after this card go deeper — the rolling, the fixes, the variations — but if you just want to make them, this card is the whole recipe.
| Prep time | 25 minutes hands-on |
| First rise | 60–75 minutes |
| Second rise | 30–40 minutes |
| Bake time | 22–26 minutes at 350°F (175°C) |
| Total time | About 2 hours 15 minutes |
| Yield | 6 rolls |
| Pan | 8-inch round cake pan or 8×8-inch square pan |
| Course | Breakfast or brunch |
| Cuisine | American, fall baking |
| Method | Yeasted dough, baked |
| Difficulty | Easy to moderate |
Overview
| Main ingredients | Pumpkin puree, cinnamon, brown sugar, cream cheese |
| Key flavour | Cinnamon and pumpkin spice, brown sugar, tangy frosting |
| Texture | Soft and pillowy, gooey centre, lightly crisped edges |
| Calories per roll | About 380 with frosting |
| Protein per roll | About 6 g |
| Storage | 2 days at room temperature, 5 days in the fridge, 2 months in the freezer |
| Make-ahead | Overnight rise in the fridge, bake in the morning |
Ingredients
For the dough:
- 2¼ cups (280 g) bread flour or all-purpose flour — bread flour gives a chewier roll; all-purpose gives a softer one. Both work
- ¼ cup (50 g) granulated sugar
- 2¼ teaspoons (1 packet, 7 g) instant yeast
- 1 teaspoon pumpkin pie spice
- ½ teaspoon fine sea salt
- ½ cup (120 ml) whole milk, warmed to 110°F (43°C) — warm to the touch, not hot
- ⅓ cup (80 g) pumpkin puree — pure pumpkin, not pie filling
- 3 tablespoons (42 g) unsalted butter, melted and slightly cooled
- 1 large egg, at room temperature
For the filling:
- 3 tablespoons (42 g) unsalted butter, softened to room temperature — soft enough to spread, not melted
- ⅓ cup (70 g) light brown sugar, packed
- 1½ tablespoons ground cinnamon — cassia cinnamon, for the bold flavour
- ½ teaspoon pumpkin pie spice
- A pinch of salt — it sharpens the sweetness
For the cream cheese frosting:
- 4 ounces (115 g) cream cheese, softened to room temperature
- 2 tablespoons (28 g) unsalted butter, softened
- ¾ cup (90 g) powdered sugar
- ½ teaspoon vanilla extract
- 1 tablespoon milk — more if you want it thinner
- A pinch of salt
Optional topping:
- 2 tablespoons chopped pecans, toasted — for crunch on top
Equipment
- One large mixing bowl — big enough for the dough to double in it
- A wooden spoon and your hands — a stand mixer with a dough hook works too, but it is not required
- A rolling pin — a wine bottle works in a pinch
- An 8-inch round cake pan — or an 8×8-inch square pan, greased with butter
- Plastic wrap or a clean kitchen towel — for covering the dough while it rises
- A sharp knife or unflavoured dental floss — for slicing the rolls cleanly
- An instant-read thermometer — the only reliable way to know they are done
- A small bowl and a spatula — for the frosting
Quick Instructions
- Whisk the flour, sugar, yeast, pumpkin pie spice and salt in a large bowl. In a separate bowl or jug, whisk the warm milk, pumpkin puree, melted butter and egg.
- Pour the wet ingredients into the dry and stir with a wooden spoon until a shaggy dough forms. Turn it out onto a lightly floured surface and knead for 6–8 minutes until smooth and slightly tacky — it should spring back slowly when you poke it.
- Shape the dough into a ball, place it in a lightly greased bowl, cover, and let it rise in a warm spot for 60–75 minutes, until doubled in size.
- Punch the dough down gently. Roll it out on a lightly floured surface into a rectangle about 12 inches by 9 inches, with the long side facing you.
- Spread the softened butter evenly over the rectangle, leaving a ½-inch border along the far edge. Mix the brown sugar, cinnamon, pumpkin pie spice and salt, and sprinkle it evenly over the butter. Press it in lightly with your palm.
- Roll the rectangle up tightly from the long side nearest you, pinching the seam closed. Slice into 6 even pieces with a sharp knife or dental floss.
- Place the rolls cut-side up in the greased 8-inch pan, leaving a little space between them. Cover and let them rise for 30–40 minutes, until puffy and touching.
- Bake at 350°F (175°C) for 22–26 minutes, until golden on top and 190°F (88°C) in the centre of the middle roll.
- While the rolls bake, beat the cream cheese, butter, powdered sugar, vanilla, milk and salt until smooth. Spread over the warm rolls, sprinkle with pecans if using, and serve.
Step-by-Step: Making Small Batch Pumpkin Cinnamon Rolls
Step 1: Mix the Dough
Put the flour, sugar, yeast, pumpkin pie spice and salt in a large bowl and whisk them together. You want the yeast evenly distributed before any liquid goes in, because a clump of yeast in one spot means one part of the dough rises faster than the rest.
In a separate jug or bowl, whisk the warm milk, pumpkin puree, melted butter and egg. The mixture will look orange and slightly strange — that’s the pumpkin. Pour it into the flour and stir with a wooden spoon. At first it will look like a mess: shaggy, sticky, uneven. Keep stirring. After a minute or so, it comes together into a rough dough that pulls away from the sides of the bowl. That’s your cue to stop stirring and start kneading.
Check the milk temperature before you pour it in. 110°F (43°C) is the target, warm to the touch. If you melted the butter in the microwave and it’s still hot, let it cool for a few minutes — hot butter plus warm milk can push the mixture over the line that kills yeast. The butter should be melted but not hot, about the temperature of the milk. If in doubt, wait. Five minutes of cooling is cheaper than a dead batch of dough.
Step 2: Knead for 6–8 Minutes
Turn the dough out onto a lightly floured surface. It will be sticky at first — that’s normal, and it’s the pumpkin. Don’t add a lot of extra flour. A tablespoon dusted on the surface and a little on your hands is enough. Too much flour makes a stiff dough, and a stiff dough makes dense rolls.
Knead by pushing the dough away from you with the heel of your hand, folding it back, turning it a quarter turn, and repeating. After three or four minutes, the dough starts to change: it gets smoother, less sticky, more elastic. After six to eight minutes, it should be smooth and slightly tacky — it sticks to your fingers a little when you touch it, but it doesn’t leave dough all over your hands. Poke it with a finger: it should spring back slowly. If the dent stays, knead for another minute. If it springs back fast, you’re done.
Step 3: First Rise, 60–75 Minutes
Shape the dough into a smooth ball — tuck the edges underneath until the top is taut. Put it in a lightly greased bowl, turn it once so the top is oiled, and cover the bowl with plastic wrap or a clean kitchen towel.
Now find a warm spot. The dough wants to be around 75–80°F (24–27°C). In most kitchens, that’s a spot near the stove, on top of the fridge, or in the oven with just the light on. The oven-light trick is the most reliable one I know: the bulb puts out just enough heat to hold the dough at the right temperature, and the closed door keeps it draught-free.
Wait 60–75 minutes. The dough should roughly double in size. The test is the poke: press a finger into the dough about half an inch. If the dent springs back immediately, it needs more time. If it springs back slowly, it’s ready. If the dent stays put, it’s slightly over-risen — use it right away, don’t wait any longer.
Step 4: Roll It Out and Fill It
Punch the dough down — one firm press in the middle, enough to let the air out, not a beating. Turn it out onto a lightly floured surface and roll it into a rectangle about 12 inches wide and 9 inches tall, with the long side facing you. The dough will be soft and easy to roll, and it might spring back a little. If it resists, let it rest for five minutes and try again. Resting lets the gluten relax, and the dough will roll out without a fight.
Spread the softened butter over the rectangle with a spatula or the back of a spoon. Leave a ½-inch strip of bare dough along the far long edge — that’s the seam, and butter on the seam stops it from sealing. Then mix the brown sugar, cinnamon, pumpkin pie spice and salt in a small bowl, and sprinkle it evenly over the butter. All of it. It looks like a lot, and it is — but most of it melts into the butter during baking and becomes the gooey swirl. Press the sugar mixture down lightly with your palm so it sticks to the butter instead of falling off when you roll.
Here’s the part people rush: spread the filling all the way to the edges on the two short sides and the near long side. Bare patches at the edges mean rolls with no swirl on the outside, and the outside of the roll is the part you see. The only edge that stays bare is the far one, the seam.
Step 5: Roll, Slice, and Pan
Roll the rectangle up from the long side nearest you. Keep it snug — not tight enough to squeeze the filling out, but tight enough that there are no air gaps between the layers. Air gaps turn into hollow rolls with a hole in the middle. Roll steadily, a little at a time, and when you reach the far edge, pinch the seam closed with your fingers.
Now slice. You want six even rolls, each about 2 inches wide. A sharp knife works, but it can squash the roll as it cuts — use a gentle sawing motion, not a press. The cleaner method is unflavoured dental floss: slide a piece under the log, cross the ends over the top, and pull. It cuts through the soft dough without squashing it, and the spirals stay round.
Trim the very ends of the log first — the first half-inch on each side is usually a little uneven and light on filling. You can bake those scraps anyway (baker’s treat), or toss them. Then cut the log in half, cut each half into three, and you have six rolls of almost exactly the same size.
Place the rolls cut-side up in the greased 8-inch pan. They should have a little space between them — about a finger’s width. They’ll fill the gaps during the second rise and baking. If you use an 8×8 square pan instead, the arrangement is the same: six rolls, a little space, cut-side up.
Step 6: Second Rise, 30–40 Minutes
Cover the pan loosely with plastic wrap or a towel and put it back in the warm spot. The second rise is shorter — 30–40 minutes — and the rolls should get puffy and start touching each other. They won’t double in size the way the dough did; they’ll grow by about half, and that’s enough. The rolls should look soft and slightly domed, like they’ve had a good nap.
Don’t skip this rise, and don’t rush it. The second rise is what makes the rolls light instead of dense. The window is generous, 30 to 45 minutes, and the visual test is simple: puffy, touching, soft to the touch. When in doubt, err on the side of slightly under-risen. Under-risen rolls still bake up fine; over-risen ones don’t recover.
While the rolls rise, preheat the oven to 350°F (175°C). Put the rack in the middle. A middle rack means even heat from above and below, which is what you want for a pan of rolls that need to bake through without the tops burning.
Step 7: Bake 22–26 Minutes
Uncover the pan and slide it into the oven. Bake for 22–26 minutes. At the 20-minute mark, check the colour: the tops should be golden brown, with the edges a little darker. The filling between the spirals will be bubbling — that’s the brown sugar and butter caramelising, and it’s exactly what you want to see.
The reliable test is temperature. An instant-read thermometer pushed into the centre of the middle roll should read 190°F (88°C). Below 185°F, the centre is still doughy. Above 195°F, the rolls start to dry out. 190°F is the number. If you don’t have a thermometer, look for the signs: golden tops, bubbling filling, and the rolls pulling very slightly away from the sides of the pan. If the tops are browning too fast before the centre is done, tent a piece of foil loosely over the pan for the last five minutes.
Let the rolls cool in the pan for about five minutes before frosting. Five minutes is the sweet spot — the rolls are still warm enough that the frosting melts into the spirals a little, but not so hot that it slides straight off and pools at the bottom of the pan.
Step 8: Frost While Warm
Beat the softened cream cheese and butter together until smooth — about a minute with a hand mixer, or a couple of minutes with a spoon and some elbow. Add the powdered sugar, vanilla, milk and salt, and beat again until it’s smooth and spreadable. It should be thick enough to hold its shape on a spoon but soft enough to spread. If it’s too thick, add milk a teaspoon at a time. If it’s too thin, add a tablespoon more powdered sugar.
Spread the frosting over the warm rolls with a spatula, pushing it into the spirals so it melts into the grooves. Be generous — this is a small batch, and the frosting is half the point. Sprinkle the toasted pecans on top if you’re using them. Serve while the rolls are still warm, and don’t wait for permission. Cinnamon rolls are best eaten with your hands, standing in the kitchen, before they even make it to the table.
The Frosting Question: Cream Cheese, Glaze, or Brown Butter?
Cream cheese frosting is the classic on a cinnamon roll, and it’s the one this recipe uses. But it’s not the only option, and the choice changes the roll more than you’d expect.
| Frosting | What it tastes like | Best when | How to make it |
|---|---|---|---|
| Cream cheese frosting | Tangy, rich, thick — the classic | You want the full cinnamon-roll experience | Beat 4 oz cream cheese, 2 tbsp butter, ¾ cup powdered sugar, ½ tsp vanilla, 1 tbsp milk, pinch of salt |
| Vanilla glaze | Sweet, light, lets the spice shine | You find cream cheese frosting too heavy | Whisk 1 cup powdered sugar with 2–3 tbsp milk and ½ tsp vanilla until pourable |
| Brown butter frosting | Nutty, caramel-like, warm | You want something a little fancier | Brown 4 tbsp butter in a pan, cool slightly, beat with 1 cup powdered sugar and 1–2 tbsp milk |
| Maple glaze | Sweet, woodsy, autumnal | You’re serving them with coffee on a cold morning | Whisk 1 cup powdered sugar with 3 tbsp maple syrup and 1 tbsp milk |
| No frosting, brown sugar topping | The roll itself, nothing on top | You prefer the filling to be the star | Sprinkle 2 tbsp brown sugar and a pinch of cinnamon over the rolls before baking |
Cream cheese frosting wins for a reason: the tang cuts through the sweetness of the filling. A cinnamon roll is a very sweet thing — brown sugar, frosting, more sugar — and without something tangy to balance it, it can taste one-note. The cream cheese is that balance. It’s the same logic as a squeeze of lemon on a rich dessert, or salt on caramel. The tang makes the sweet taste sweeter by contrast.
The temperature of the cream cheese matters more than the recipe does. Cold cream cheese straight from the fridge will not beat smooth — it’ll stay lumpy no matter how long you mix it, and the lumps are little white blobs in an otherwise smooth frosting. Let the cream cheese sit on the counter for 30–45 minutes before you start. Same for the butter. Soft, room-temperature cream cheese and butter beat into a frosting that’s smooth in under a minute.
Frost while the rolls are warm, not hot. Hot rolls melt the frosting into a puddle at the bottom of the pan. Cold rolls leave the frosting sitting on top in a thick layer that never quite settles into the spirals. Warm — five minutes out of the oven — is the moment when the frosting softens just enough to sink into the grooves and stay there.
What Goes Wrong (and the Fix)
Yeasted dough has a short list of problems, and every one of them has a simple fix. If something goes wrong the first time, it is almost certainly one of these.
| Problem | Why it happened | How to fix it |
|---|---|---|
| Dough didn’t rise at all | Yeast was dead, or the milk was too hot (over 130°F) | Proof the yeast first next time; use milk at 110°F; start over with fresh yeast |
| Dough rose very slowly | Kitchen too cold, or old yeast | Move the bowl to a warmer spot (oven with light on); check the yeast date |
| Rolls are dense and heavy | Under-risen, over-kneaded, or too much flour added | Let the second rise go the full 40 minutes; knead 6–8 minutes only; measure flour by weight |
| Rolls have a hollow centre | Rolled too loosely, or air trapped between layers | Roll snugly and press out air as you go; slice with floss, not a pressing knife |
| Filling leaked out during baking | Too much butter, or the seam wasn’t sealed | Use 3 tbsp butter, not more; pinch the seam firmly closed; place rolls seam-side down |
| Tops browned but centre is raw | Oven too hot, or pan on too high a rack | Bake at 350°F on the middle rack; tent foil over the top for the last 5 minutes; check 190°F inside |
| Rolls are dry | Overbaked, or too little pumpkin | Pull at 190°F, not 200°F; measure the pumpkin — ⅓ cup, level |
| Frosting is lumpy | Cream cheese was cold | Let cream cheese reach room temperature; beat it alone first, then add the rest |
| Frosting slid off the rolls | Frosted while the rolls were too hot | Wait 5 minutes after baking; frosting should melt into the spirals, not run off |
| Rolls stuck to the pan | Pan wasn’t greased, or they cooled in the pan too long | Grease the pan well with butter; run a knife around the edge after 5 minutes; don’t leave them in the pan overnight |
The most common problem is the dough not rising, and the most common cause is milk that was too hot. People heat the milk in the microwave, and microwaves heat unevenly — one spot is 150°F while the rest is 90°F. Stir the milk after heating, and test it with your finger or a thermometer. 110°F. Warm, not hot. It’s a small detail and it decides the whole recipe.
Variations Worth Trying
Once you have the base recipe down, it is easy to change. The dough is forgiving, and the filling welcomes company.
- Pecan pumpkin rolls: Add ¼ cup of finely chopped toasted pecans to the filling before rolling. They toast further in the oven and give the swirl a crunch that the soft dough doesn’t have on its own. Toast the pecans in a dry pan for two minutes first — raw pecans taste flat, toasted ones taste like something.
- Maple pumpkin rolls: Swap the brown sugar in the filling for the same amount of maple sugar, or brush the baked rolls with 2 tablespoons of warm maple syrup before frosting. The maple sits behind the cinnamon and makes the whole roll taste a little more like a New England autumn. If you like this kind of autumn baking, our Mini Apple Cider Cheesecakes Recipe uses the same maple-and-spice thinking in a completely different dessert.
- Chocolate chip pumpkin rolls: Sprinkle ¼ cup of mini chocolate chips over the filling before rolling. The chocolate melts into the swirl and turns the rolls into something closer to a pastry. Use mini chips, not regular — regular chips are too big and they tear the dough when you slice.
- Apple pumpkin rolls: Spread ½ cup of finely diced apple (Honeycrisp or Granny Smith) over the filling before rolling. The apple softens in the oven and adds little pockets of tartness. Dice it small — quarter-inch pieces — or the slices will poke through the dough and make it hard to roll.
- Overnight version: After placing the sliced rolls in the pan, cover tightly and refrigerate overnight, up to 16 hours. In the morning, take the pan out, let it sit on the counter for 30–45 minutes while the oven preheats, and bake as usual, adding 2–3 minutes to the bake time. The slow overnight rise actually improves the flavour — the yeast has more time to develop, and the rolls taste a little more complex.
- Dairy-free version: Use oat milk in the dough, coconut oil or vegan butter in place of the butter, and a dairy-free cream cheese for the frosting. The dough will be slightly less rich, but the pumpkin carries enough moisture that the difference is small. The frosting is the hardest part to get right dairy-free — look for a cream cheese alternative that beats smooth at room temperature.
How to Serve Them
Six rolls, a small pan, and a warm kitchen — the serving is simple. But the occasion changes what goes with them.
| Occasion | How to serve it | What to serve with it |
|---|---|---|
| Slow Sunday breakfast | Straight from the pan, frosting still warm, on small plates | Strong coffee, or chai — the spice in chai echoes the pumpkin pie spice |
| Holiday brunch | On a cake stand, dusted with a little extra cinnamon | Scrambled eggs and bacon, to balance the sweet; fresh fruit on the side |
| After-school snack | One roll each, with a glass of cold milk | Nothing else — the roll is the whole event |
| Bake-sale or gift | In a small box lined with parchment, tied with twine | A card with the recipe — people will ask for it |
| With kids | Let them frost their own roll at the table | Sprinkles on the side; the pecans go in a separate bowl for the adults |
Coffee is the classic partner, and it works because the bitterness of coffee cuts the sweetness of the roll. Chai is the better partner — the ginger and cardamom in chai sit in the same spice family as pumpkin pie spice, and the two together taste like they were planned.
Storage, Freezing and Reheating
Six rolls disappear fast, but if there are leftovers, they keep better than most cinnamon rolls — the pumpkin again.
| Room temperature | Fridge | Freezer | |
|---|---|---|---|
| Baked rolls, frosted | 1 day, covered | 3 days in an airtight container | Not recommended — the frosting goes grainy |
| Baked rolls, unfrosted | 2 days, covered | 5 days in an airtight container | 2 months, wrapped tightly |
| Unbaked rolls, in the pan | Not recommended | Overnight (up to 16 hours), covered tightly | 1 month, wrapped tightly, thaw overnight in the fridge |
| Frosting, on its own | 2 hours | 5 days in a jar | Not recommended |
| Dough, before rolling | Not recommended | Overnight (up to 16 hours) | 1 month, thaw overnight in the fridge, then roll and rise |
To freeze baked rolls, let them cool completely, wrap each one individually in plastic wrap, and put them in a freezer bag. Individual wrapping means you can take out one roll at a time instead of thawing all six. To reheat, unwrap and microwave for 20–25 seconds, or warm in a 300°F (150°C) oven for 8–10 minutes. Frost after reheating, not before freezing — frosting freezes badly and thaws worse.
To freeze unbaked rolls, place the sliced rolls in the pan, cover tightly with two layers of plastic wrap, and freeze. When you want them, move the pan to the fridge the night before, then let it sit on the counter for 45–60 minutes in the morning to finish rising, and bake as usual. The rise will be slower than fresh dough because the yeast is waking up from the cold, so give it the full hour.
Nutrition: What Is in a Roll?
The numbers below are estimates for one roll with frosting, calculated from the ingredients in the recipe card. They will move a little depending on your exact flour and cream cheese, but they are close enough to plan around.
| Nutrient | Per roll (with frosting) |
|---|---|
| Calories | About 380 |
| Protein | About 6 g |
| Carbohydrates | About 58 g |
| Fat | About 14 g |
| Saturated fat | About 8 g |
| Fibre | About 2 g |
| Sugar | About 28 g |
| Sodium | About 260 mg |
| Vitamin A | About 35% of daily value (from the pumpkin) |
Most of the sugar comes from the filling and the frosting, which is worth knowing and not worth worrying about — this is a cinnamon roll, not a salad. The pumpkin does add something real: about 35% of your daily vitamin A per roll, plus a little fibre and potassium. It’s not health food, and it doesn’t pretend to be. But the pumpkin means the roll is doing slightly more for you than a plain cinnamon roll, and that’s a fair trade for a breakfast that tastes like this.
Frequently Asked Questions
Can I make small batch pumpkin cinnamon rolls ahead of time?
Yes, and the overnight version is one of the best ways to make them. After slicing and panning the rolls, cover the pan tightly and refrigerate overnight, up to 16 hours. In the morning, take the pan out, let it sit on the counter for 30–45 minutes while the oven preheats, and bake as usual, adding 2–3 minutes to the bake time. The slow cold rise actually improves the flavour. You can also freeze the unbaked rolls for up to a month — thaw overnight in the fridge, let them rise for an hour on the counter, and bake.
Can I use active dry yeast instead of instant yeast?
Yes. Dissolve the same amount — 2¼ teaspoons — in the warm milk with a pinch of sugar, and let it sit for 5–10 minutes until it foams. Then add the milk mixture to the flour as usual. Everything else stays the same. The foaming is your proof that the yeast is alive, which is a nice bit of reassurance before you commit two hours to a dough.
What if I don’t have pumpkin pie spice?
Make it: 3 tablespoons of cinnamon, 2 teaspoons of ginger, 2 teaspoons of nutmeg, 1½ teaspoons of allspice, and 1½ teaspoons of ground cloves, mixed together. You’ll have about a third of a cup, which keeps for months in a jar. If you’re short on one spice — no allspice, say — just leave it out and add a little extra cinnamon and nutmeg. The blend is forgiving. And if you like baking with warm spices, our No Bake Gingerbread Protein Balls Recipe uses a similar spice family in a no-bake treat that’s ready in twenty minutes.
Can I use fresh pumpkin instead of canned?
Yes. Roast a small sugar pumpkin — not a carving pumpkin, which is watery and stringy — until soft, scoop out the flesh, and blend until smooth. Let the puree drain in a fine sieve for about 20 minutes before measuring, because fresh puree is thinner than canned and the extra water will make the dough sticky. Fresh puree tastes a touch brighter than canned. Canned is more consistent, and for a recipe where the dough’s moisture matters, canned is the safer choice.
Why did my rolls turn out dense?
Three usual reasons. First, the dough was under-risen — the second rise needs the full 30–40 minutes, and a cool kitchen needs longer. Second, too much flour was added during kneading, which makes a stiff dough that can’t expand. Measure by weight if you can: 280 grams. Third, the yeast was old or weak. Check the date on the packet, and proof it in warm milk before you start if you’re not sure. Dense rolls are almost always a rise problem, not a recipe problem.
Can I make these without a stand mixer?
Yes — this recipe was written for hands. A wooden spoon for the mixing and your hands for the kneading, 6–8 minutes. A stand mixer with a dough hook saves effort, but it doesn’t change the result. The dough is soft and easy to work with, and kneading by hand lets you feel when it’s ready: smooth, slightly tacky, springs back slowly when poked. If you’ve never kneaded dough before, this is a good first one — and if you want more practice with yeasted dough, our Air Fryer Cottage Cheese Bagels use a similar soft dough in a completely different shape.
How do I know when the rolls are done?
Temperature is the reliable answer: 190°F (88°C) in the centre of the middle roll, measured with an instant-read thermometer. Visually, the tops should be golden brown, the filling should be bubbling between the spirals, and the rolls should pull very slightly away from the sides of the pan. If the tops are browning too fast, tent foil loosely over the pan for the last five minutes. Underbaked rolls are doughy in the middle — and the middle roll is always the last to finish, so test that one, not an edge roll.
Can I double the recipe?
Yes. Double every ingredient and make two pans of six, or use a 9×13-inch pan for all twelve. The rise times stay roughly the same — a bigger dough takes a few minutes longer on the first rise, but not much. Bake a 9×13 pan for 25–30 minutes instead of 22–26, and check the middle roll’s temperature. Two small pans bake more evenly than one big one, so if you have two 8-inch pans, use both.
Can I freeze the baked rolls?
Yes, unfrosted. Let them cool completely, wrap each one in plastic wrap, and freeze for up to two months. Reheat in a 300°F oven for 8–10 minutes, or microwave for 20–25 seconds, then frost fresh. Don’t freeze them frosted — cream cheese frosting goes grainy in the freezer and never quite recovers. The frosting takes two minutes to make, so there’s no reason to freeze it on.
Final Thoughts
This is a recipe for a quiet morning. Not a holiday, not a party — just a morning when you have two hours and you want the house to smell like cinnamon. Six rolls, one small pan, a pot of coffee, and nobody in a hurry. That’s the whole thing, and it’s enough.
Make them once exactly as written. Then make them yours. Add the pecans if you like crunch, or try the maple version when the leaves turn. The dough is forgiving enough to carry all of it, and the small batch means you can try a new variation every time without committing to twelve rolls of an experiment.
And if you have a can of pumpkin puree sitting in the cupboard right now — the one you bought for a pie you never made — this is what it was waiting for. It was never going to become a pie. It was always going to end up here, warm and orange, swirled with cinnamon and brown sugar, under a layer of frosting that’s still melting. Some ingredients sit in the cupboard for months. This one just needed the right morning.
Sources
- USDA FoodData Central, “Pumpkin, canned, without salt” — nutrition values for canned pumpkin, including vitamin A and fibre per 100 g: https://fdc.nal.usda.gov/
- USDA FoodData Central, “Cinnamon, ground” — nutrition and composition of ground cinnamon: https://fdc.nal.usda.gov/
- USDA Food Safety and Inspection Service, yeast and dough handling guidance — safe temperatures for yeasted doughs and storage: https://www.fsis.usda.gov/
- Wikipedia, “Cinnamon roll” — history and preparation of cinnamon rolls, including regional variations: https://en.wikipedia.org/wiki/Cinnamon_roll
- Wikipedia, “Pumpkin pie spice” — composition of pumpkin pie spice and its traditional blend: https://en.wikipedia.org/wiki/Pumpkin_pie_spice
- Wikipedia, “Cinnamon” — cassia vs Ceylon cinnamon, flavour and composition: https://en.wikipedia.org/wiki/Cinnamon
- Wikipedia, “Yeast” — how yeast works in baking, temperature ranges and fermentation: https://en.wikipedia.org/wiki/Yeast

3 thoughts on “Small Batch Pumpkin Cinnamon Rolls Recipe”